Building a native macOS app using SwiftUI and Combine
Have you ever been asked to put together the list of licenses of all frameworks that are used within your iOS, iPad OS, or macOS app? Manually completing this task quickly becomes tedious but may be required due to legal- or customer requests.
To mitigate this issue, I developed Licenses, a native macOS app that automates this procedure by collecting and exporting your licenses into a single spreadsheet (CSV) file.
In this article, I want to share my experience as well as the challenges that I faced when developing the app using SwiftUI 2.0 and Combine. This way, I hope to provide additional documentation on how declarative macOS apps can be built and to encourage others to also bring their ideas to the Mac.
You can get the latest version of Licenses in the Mac AppStore (Link) or check out the project on GitHub (Link).
Architecture
Licenses, uses a redux-inspired architecture, as illustrated in figure 1, consisting of Data-, Bloc-, ViewStore- and UI-related components. This way, state changes only occur within the bloc's reducer function, transforming incoming actions as well as the current state to an updated state that is ultimately consumed by the UI.
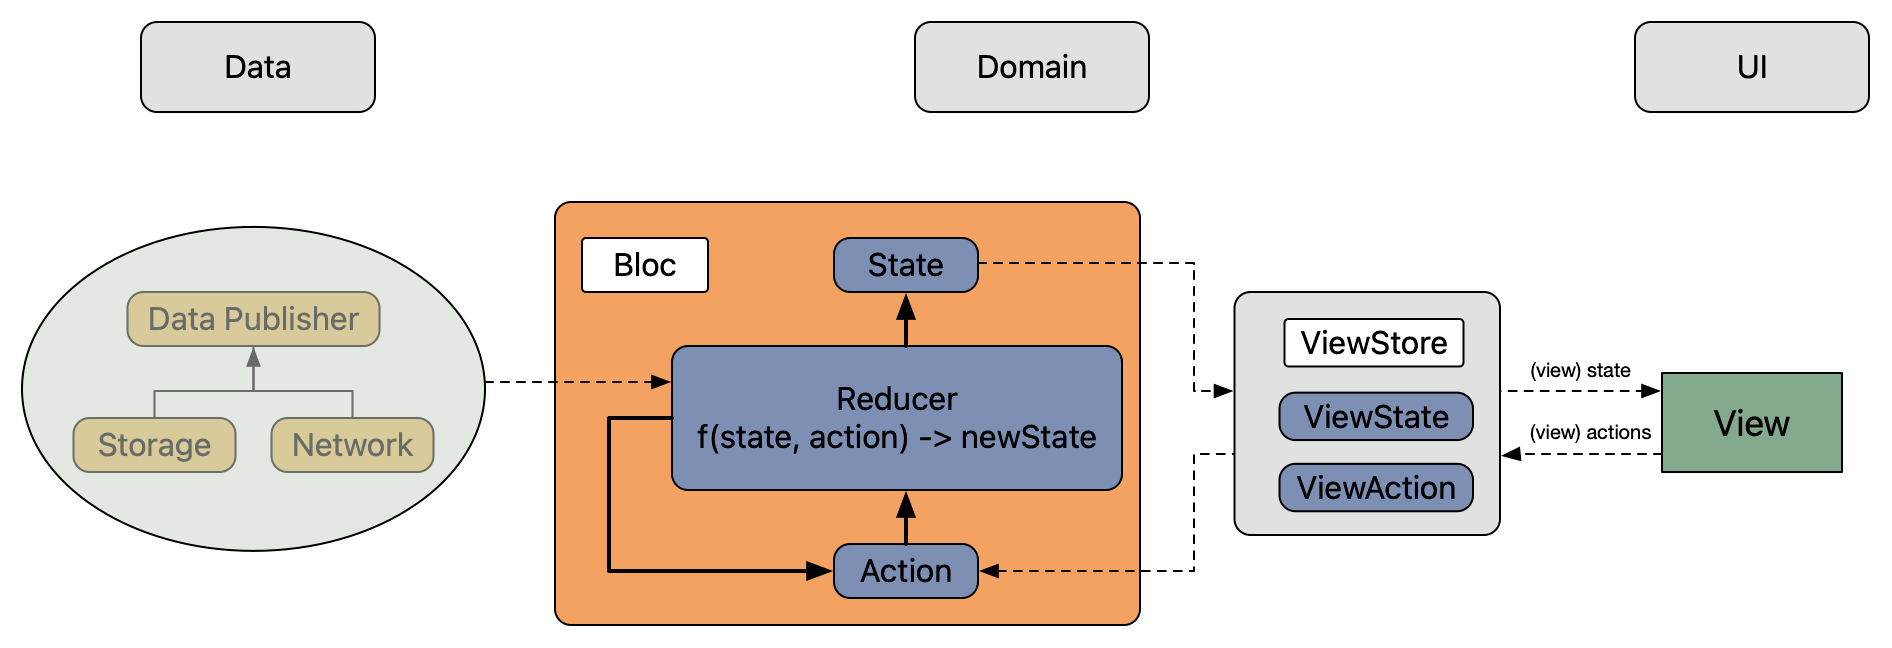
Also, side effects are performed by returning publishers from the reducer resulting in additional actions that are sent to the bloc. Hence, asynchronous work is treated similarly to synchronous work in the way that it only affects the state from within the reducer. Thus, the correctness of the reducer and as such the correctness of all state changes becomes testable through unit tests.
Note that blocs are not directly connected to the UI, but rather via view stores that act as the main communication gateway of the view. As a result, domain-specific knowledge is not exposed, but rather gets translated into view-specific models that only include the formatted data that is ready to be shown in the UI. As an example, instead of passing repositories, i.e., [GitHubRepository], to the view directly, we can rather pass a list of items, i.e., [ListItem], where each item only consists of UI-related data (e.g., title or subtitle) and omits any internal data that is repository-specific. Similarly, view actions are translated into domain-specific actions that are forwarded by the view store to the bloc. Excluding business- and domain-specific knowledge out of the view keeps them lean and facilitates simplified previews using mock data in Xcode.
Having established an architectural overview of the app, let's focus on the business logic in terms of the processing pipeline and CSV export.
Business Logic:
Users can select manifests in Licenses by either dragging them on top of the application's window or choosing them manually from disk. In this regard, it does not matter whether a single or multiple files are selected or whether they are kept in an enclosing folder. Either way, Licenses searches for manifests at the specified location and forwards their filePaths: [URL] to the processing pipeline. As soon as licenses could be derived, the user can export them into a single spreadsheet file (CSV).
The Manifest Processing Pipeline:
As illustrated in figure 2, decoding and extracting licenses involves three consecutive steps:
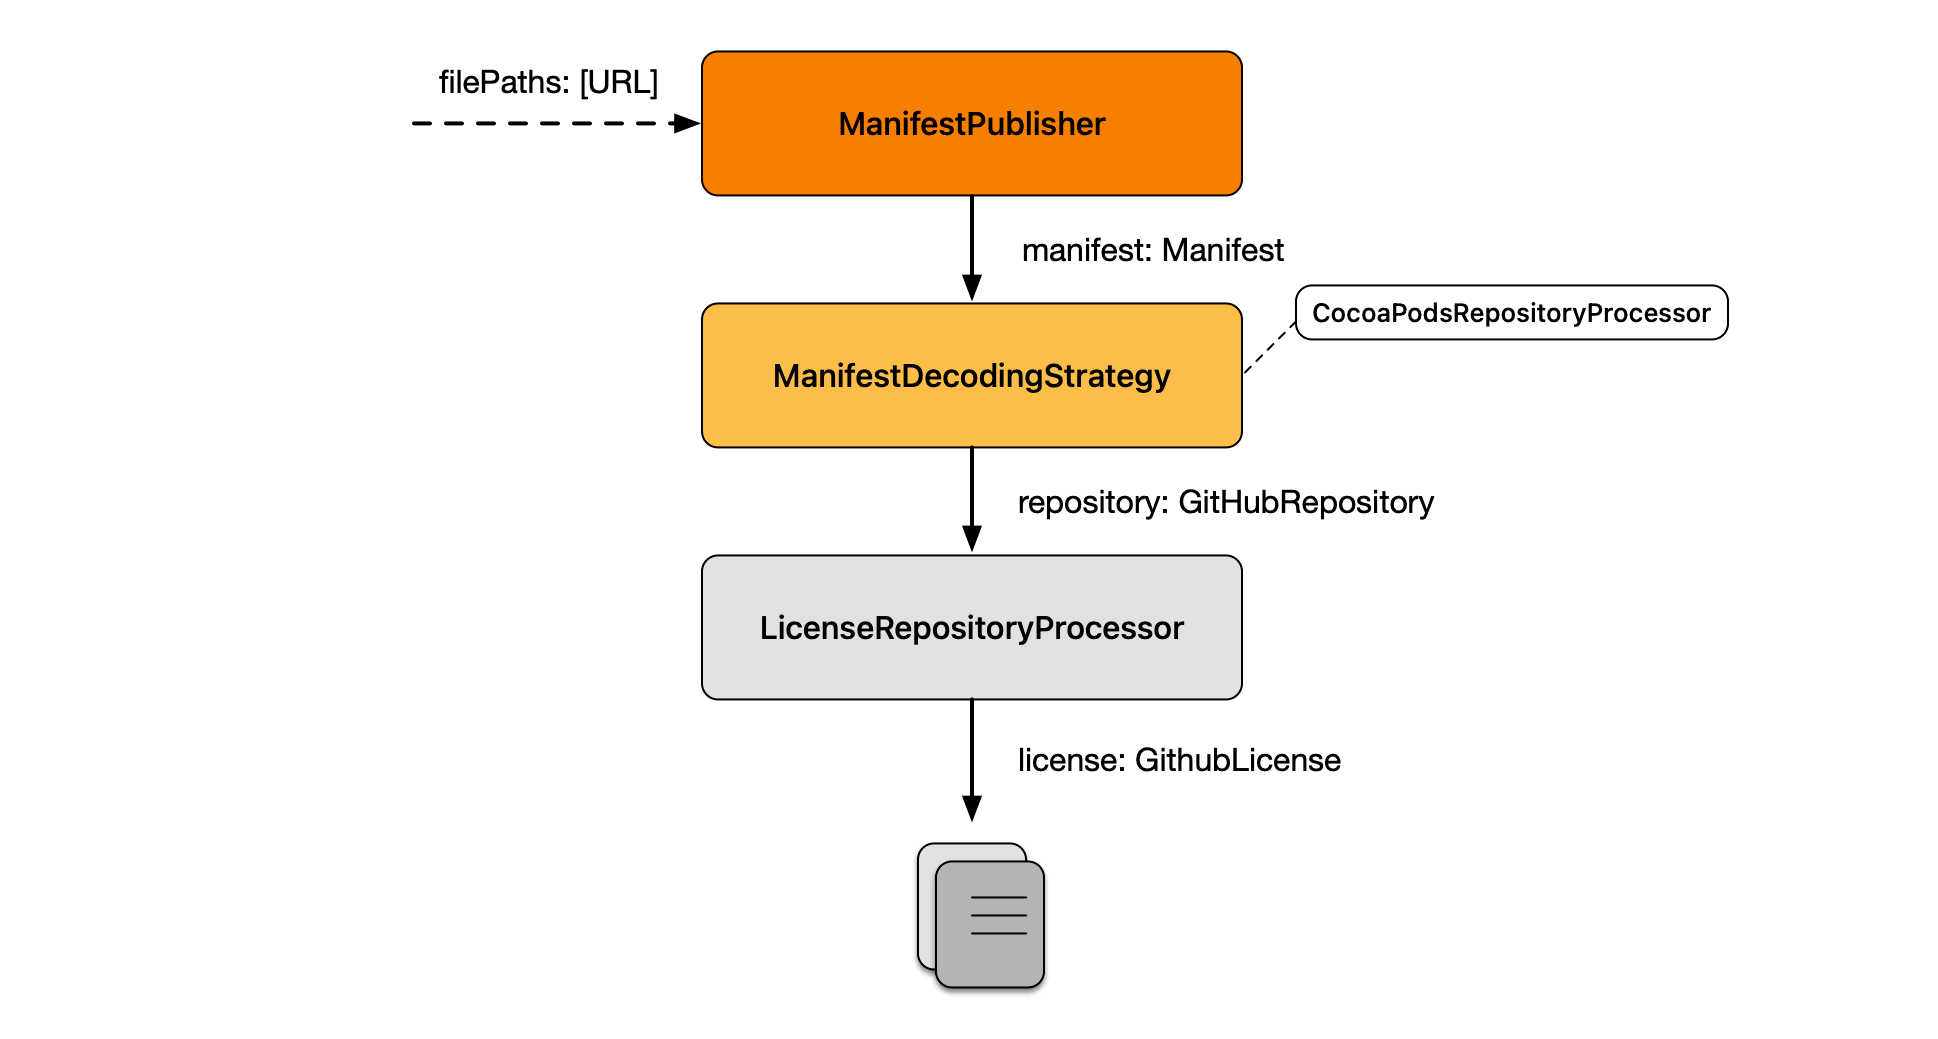
Step 1: Manifest Publisher:
First, Licenses searches for files named "Package.resolved" (SwiftPm), "Cartfile.resolved" (Carthage) or "Podfile.lock" (CocoaPods) and instantiates a Manifest for each occurence respectively.
import Combine
import Foundation

struct ManifestPublisher: Publisher {
    typealias Output = Manifest
    typealias Failure = Never

    private let subject: PassthroughSubject<Manifest, Never> = .init()
    private let dispatchGroup: DispatchGroup = .init()
    private let dispatchQueue: DispatchQueue = .global(qos: .userInitiated)
    private let filePaths: [URL]

    init(filePaths: [URL] = []) {
        self.filePaths = filePaths
    }

    func receive<S>(subscriber: S) where S: Subscriber, Self.Failure == S.Failure, Self.Output == S.Input {
        subject.subscribe(subscriber)

        search(at: filePaths)
    }

    private func search(at filePaths: [URL] = []) {
        filePaths.forEach { filePath in
            dispatchGroup.enter()
            dispatchQueue.async(group: dispatchGroup) {
                defer { self.dispatchGroup.leave() }

                var isDirectory: ObjCBool = false
                let fileManager: FileManager = .init()

                guard fileManager.fileExists(atPath: filePath.path, isDirectory: &isDirectory) else { return }

                if isDirectory.boolValue {
                    let enumerator = fileManager.enumerator(at: filePath, includingPropertiesForKeys: nil)
                    while let nextFilePath: URL = enumerator?.nextObject() as? URL {
                        guard let manifest = Manifest(fromFilePath: nextFilePath) else { continue }

                        self.subject.send(manifest)
                    }
                } else {
                    guard let manifest = Manifest(fromFilePath: filePath) else { return }

                    self.subject.send(manifest)
                }
            }
        }

        dispatchGroup.notify(queue: .main) {
            self.subject.send(completion: .finished)
        }
    }
}
The initializer matches the last component of the given file path against a predefined set of identifiers. As soon as a match is made, the package manager associated with the file name is assigned to the manifest. Note that the latter is required to determine the decoding strategy that is used to derive packages from the manifest.
struct Manifest: Equatable {
    var packageManager: PackageManager
    var content: String
    var filePath: URL

    init(
        packageManager: PackageManager,
        content: String,
        filePath: URL
    ) {
        self.packageManager = packageManager
        self.content = content
        self.filePath = filePath
    }

    init?(fromFilePath filePath: URL) {
        switch filePath.lastPathComponent {
        case "Cartfile.resolved":
            self.packageManager = .carthage

        case "Podfile.lock":
            self.packageManager = .cocoaPods

        case "Package.resolved":
            self.packageManager = .swiftPm

        default:
            return nil
        }

        guard let content = try? String(contentsOf: filePath, encoding: .utf8) else { return nil }

        self.content = content
        self.filePath = filePath
    }
}
Step 2: ManifestDecodingStrategy
Second, Licenses tries to retrieve the minimum set of data, like the name, author, and version of the package by applying the decoding strategy that is associated with its type. Since the decoding may fail due to syntax errors or missing information, Licenses tries to handle these cases gracefully by continuing decoding the remaining set of manifests.
Note that the algorithm makes use of the strategy pattern to be easily extensible in the future if new package managers come along. This way, we can define additional strategies by conforming to the ManifestDecodingStrategy protocol:
protocol ManifestDecodingStrategy {
    func decode(content: String) -> AnyPublisher<GithubRepository, Never>
}
As an example, please consider the implementation of the SwiftPmManifestDecodingStrategy as stated below. If the strategy could decode the given content as ResolvedPackagesEntity it publishes an instance of GithubRepository for each package respectively.
import Combine
import Foundation

struct SwiftPmManifestDecodingStrategy: ManifestDecodingStrategy {
    func decode(content: String) -> AnyPublisher<GithubRepository, Never> {
        guard
            let data = content.data(using: .utf8),
            let resolvedPackages = try? JSONDecoder().decode(ResolvedPackagesEntity.self, from: data)
        else {
            return Empty<GithubRepository, Never>().eraseToAnyPublisher()
        }

        return resolvedPackages
            .object
            .pins
            .publisher
            .compactMap { (package: PinEntity) -> GithubRepository? in
                guard
                    let (name, author) = GithubRepositoryUrlDecoder.decode(repositoryUrlString: package.repositoryUrl)
                else { return nil }

                let url: URL = GithubRepositoryUrlEncoder.encode(name: name, author: author)

                return .init(
                    packageManager: .swiftPm,
                    name: name,
                    version: package.state.version,
                    author: author,
                    url: url
                )
            }
            .eraseToAnyPublisher()
    }
}
It is important to note that packages derived from CocoaPod manifests do not include their author and hence require additional processing before licenses are fetched using the GitHub API.
The CocoaPodsRepositoryProcessor takes care of this requirement and uses the package manager's centralized registry named "CocoaPodsTrunk" to retrieve the missing information of the package.
Step 3: LicenseProcessor - Retrieving Licenses from GitHub:
Finally, given the name and author of a package we have collected sufficient information to retrieve its licenses using the Github API:
struct LicenseRepositoryProcessor: RepositoryProcessor {
    func process(repository: GithubRepository) -> AnyPublisher<GithubRepository, Never> {
        guard
            repository.license == nil,
            let (name, author) = GithubRepositoryUrlDecoder.decode(repositoryURL: repository.url)
        else {
            return Just<GithubRepository>(repository)
                .eraseToAnyPublisher()
        }

        return API.requestMappedModel(
            Github.license(name: name, author: author),
            mapper: GithubLicenseModelMapper.map
        )
        .receive(on: RunLoop.main)
        .map { license in
            let modifiedRepository: GithubRepository = repository
            modifiedRepository.license = license
            return modifiedRepository
        }
        .catch { _ in Just<GithubRepository>(repository) }
        .eraseToAnyPublisher()
    }
}
Note that network requests in Licenses are made using Aphrodite (Link), a lightweight, generic, and reactive network layer that is built on top of Combine and NSURLSession. This way, the LicenseRepositoryProcessor does not need to deal with the raw data that is returned from the Github API but rather uses a simplified model that results from the clear entity- and domain model separation offered by Aphrodite.
Consequently, all the above-mentioned steps are executed by the reducer directly or returned as side effects resulting in additional actions that are fed back into the bloc. Thus, state changes can only happen at a predefined location. Subsequently, please find the handling of the .fetchLicenses action that corresponds to the third step of the processing pipeline:
import Combine
import Foundation

struct AppReducer: BlocReducer {
    func reduce(
        state: inout AppState,
        action: AppAction,
        environment: AppEnvironment
    ) -> Effect<AppAction, Never> {
        switch action {
        case .fetchLicenses:
            return state.repositories
                .filter { $0.license == nil }
                .publisher
                .flatMap(maxPublishers: .max(3)) { repository in
                    Just(repository)
                        .flatMap { (repository: GithubRepository) -> AnyPublisher<GithubRepository, Never> in
                            environment.cocoaPodsProcessor.process(repository: repository)
                                .eraseToAnyPublisher()
                        }
                        .flatMap { repository in
                            environment.licenseProcessor.process(repository: repository)
                                .eraseToAnyPublisher()
                        }
                }
                .receive(on: RunLoop.main)
                .map(AppAction.didProcess(repository:))
                .prepend(AppAction.didStartFetchingLicenses)
                .append(AppAction.didStopFetchingLicenses)
                .eraseToEffect()

            ...
        }
    }
}
As a result, we obtain the enriched list of repositories ([GithubRepository]), ready to be exported or shown in the UI.
CSV Export
To export licenses into a machine-readable format, Licenses uses the CSVRowFactory to generate the header as well as the body including the name, version, author, and license of the given repositories. Note that the content of each row gets normalized to avoid malformed data:
struct CSVRowFactory {
    func makeRows(from repositories: [GithubRepository]) -> [[String]] {
        [makeHeaderRow()] + repositories.map(makeRow(from:))
    }
}

extension CSVRowFactory {
    private func makeHeaderRow() -> [String] {
        [
            L10n.Csv.Header.Name.title,
            L10n.Csv.Header.Version.title,
            L10n.Csv.Header.PackageManager.title,
            L10n.Csv.Header.Author.title,
            L10n.Csv.Header.LicenseUrl.title,
            L10n.Csv.Header.LicenseName.title,
            L10n.Csv.Header.LicenseContent.title
        ]
    }

    private func makeRow(from repository: GithubRepository) -> [String] {
        normalize(
            row: [
                repository.name,
                repository.version,
                repository.packageManager.rawValue,
                repository.author ?? "",
                repository.license?.downloadURL ?? "",
                repository.license?.license?.name ?? "",
                repository.license?.decodedContent ?? ""
            ]
        )
    }

    private func normalize(row: [String]) -> [String] {
        row.map { string in
            guard string.contains("\"") || string.contains(",") else { return string }

            let doubleQuotesEscapedString: String = string.replacingOccurrences(of: "\"", with: "\"\"")
            return "\("\"")\(doubleQuotesEscapedString)\("\"")"
        }
    }
}
Finally, each generated row is written to the specified destination:
import Foundation

enum CSVExporterError: Error {
    case columnMismatch
}

protocol CSVExporter {
    func exportCSV(fromRows rows: [[String]], toDestination destination: URL)
}

struct DefaultCSVExporter: CSVExporter {
    func exportCSV(fromRows rows: [[String]], toDestination destination: URL) {
        do {
            let csvString: String = try makeCSV(fromRows: rows)
            try csvString.write(to: destination, atomically: true, encoding: .utf8)
        } catch {
            print(error.localizedDescription)
        }
    }

    private func makeCSV(fromRows rows: [[String]]) throws -> String {
        var numberOfColumnsInHeader: Int?
        return try (0 ... (rows.count - 1)).reduce("") { csv, index in
            let nextRow: [String] = rows[index]

            if index == 0 {
                numberOfColumnsInHeader = nextRow.count
            } else {
                guard
                    let numberOfColumnsInHeader = numberOfColumnsInHeader,
                    nextRow.count == numberOfColumnsInHeader
                else {
                    throw CSVExporterError.columnMismatch
                }
            }

            return csv + (index > 0 ? "\n" : "") + "\(nextRow.joined(separator: ","))"
        }
    }
}
User Interface
Having referred to the processing pipeline and CSV export as the main driver of the app, let's focus on the UI as well as the challenges that I faced when bringing Licenses to the Mac.
App Lifecycle
With the introduction of the SwiftUI lifecycle at WWDC 2020, Apple removed the need for an App-/SceneDelegate and offered a declarative API to specify the entry point of the app. Licenses uses a WindowGroup as well as a preferences pane that is accessible via the menu as its building blocks. Additional entries like the app's privacy policy are realized using the .commands() modifier:

import SwiftUI

@main
struct LicensesApp: App {
    @NSApplicationDelegateAdaptor(AppDelegate.self) var delegate: AppDelegate

    var body: some Scene {
        WindowGroup {
            WindowContentContainerView()
                .frame(
                    minWidth: 1_000,
                    idealWidth: 1_200,
                    minHeight: 650,
                    idealHeight: 800,
                    alignment: .center
                )
        }.commands {
            CommandGroup(after: .help) {
                Button(L10n.PrivacyPolicy.title) {
                    guard let url = URL(string: L10n.PrivacyPolicy.url) else { return }

                    NSWorkspace.shared.open(url)
                }
            }
        }

        Settings {
            SettingsContainerView()
        }
    }
}
When adopting the SwiftUI lifecycle, it was difficult at first to come up with a solution to specify that the application should terminate as soon as the last window was closed. Luckily, Apple provides the @NSApplicationDelegateAdaptor property wrapper that supports functionality that is not covered by the declarative approach yet. This way, the intended behavior is specified in an additional AppDelegate class:
final class AppDelegate: NSObject, NSApplicationDelegate {
    func applicationShouldTerminateAfterLastWindowClosed(_ sender: NSApplication) -> Bool {
        return true
    }
}
Bloc- and ViewStoreProvider
Within the window group, container views are used to provide the bloc as well as the view store for the window's content view. Note that the BlocProvider uses the @StateObject property wrapper internally to ensure that the lifetime of the bloc is bound to the lifespan of the window. To request a bloc via the BlocProvider we only need to provide the bloc's initial state as well as its reducer function that is used for handling state changes of the window. Finally, given the bloc, the ViewStoreProvider establishes the mapping between the view-specific state/actions as well as the domain-specific state/actions using the WindowContentViewStateMapper and WindowContentViewActionMapper respectively. Injecting providers via container views keeps our content views lean and facilitates UI development using SwiftUI previews.
struct WindowContentContainerView: View {
    var body: some View {
        BlocProvider<AppState, AppAction, AppEnvironment>(
            initialState: .initial,
            reducer: AppReducer().eraseToAnyBlocReducer(),
            environment: DefaultEnvironment()
        ) { bloc in
            ViewStoreProvider(
                statePublisher: AnyStatePublisher(
                    publisher: bloc,
                    stateMapper: WindowContentViewStateMapper.map(state:)
                ),
                actionReceiver: AnyActionReceiver(
                    receiver: bloc,
                    actionMapper: WindowContentViewActionMapper.map(action:)
                )
            ) { store in
                WindowContentView(store: store)
            }
        }
    }
}
Window Content
In Licenses the WindowContentView is made of smaller views that together compose the UI:
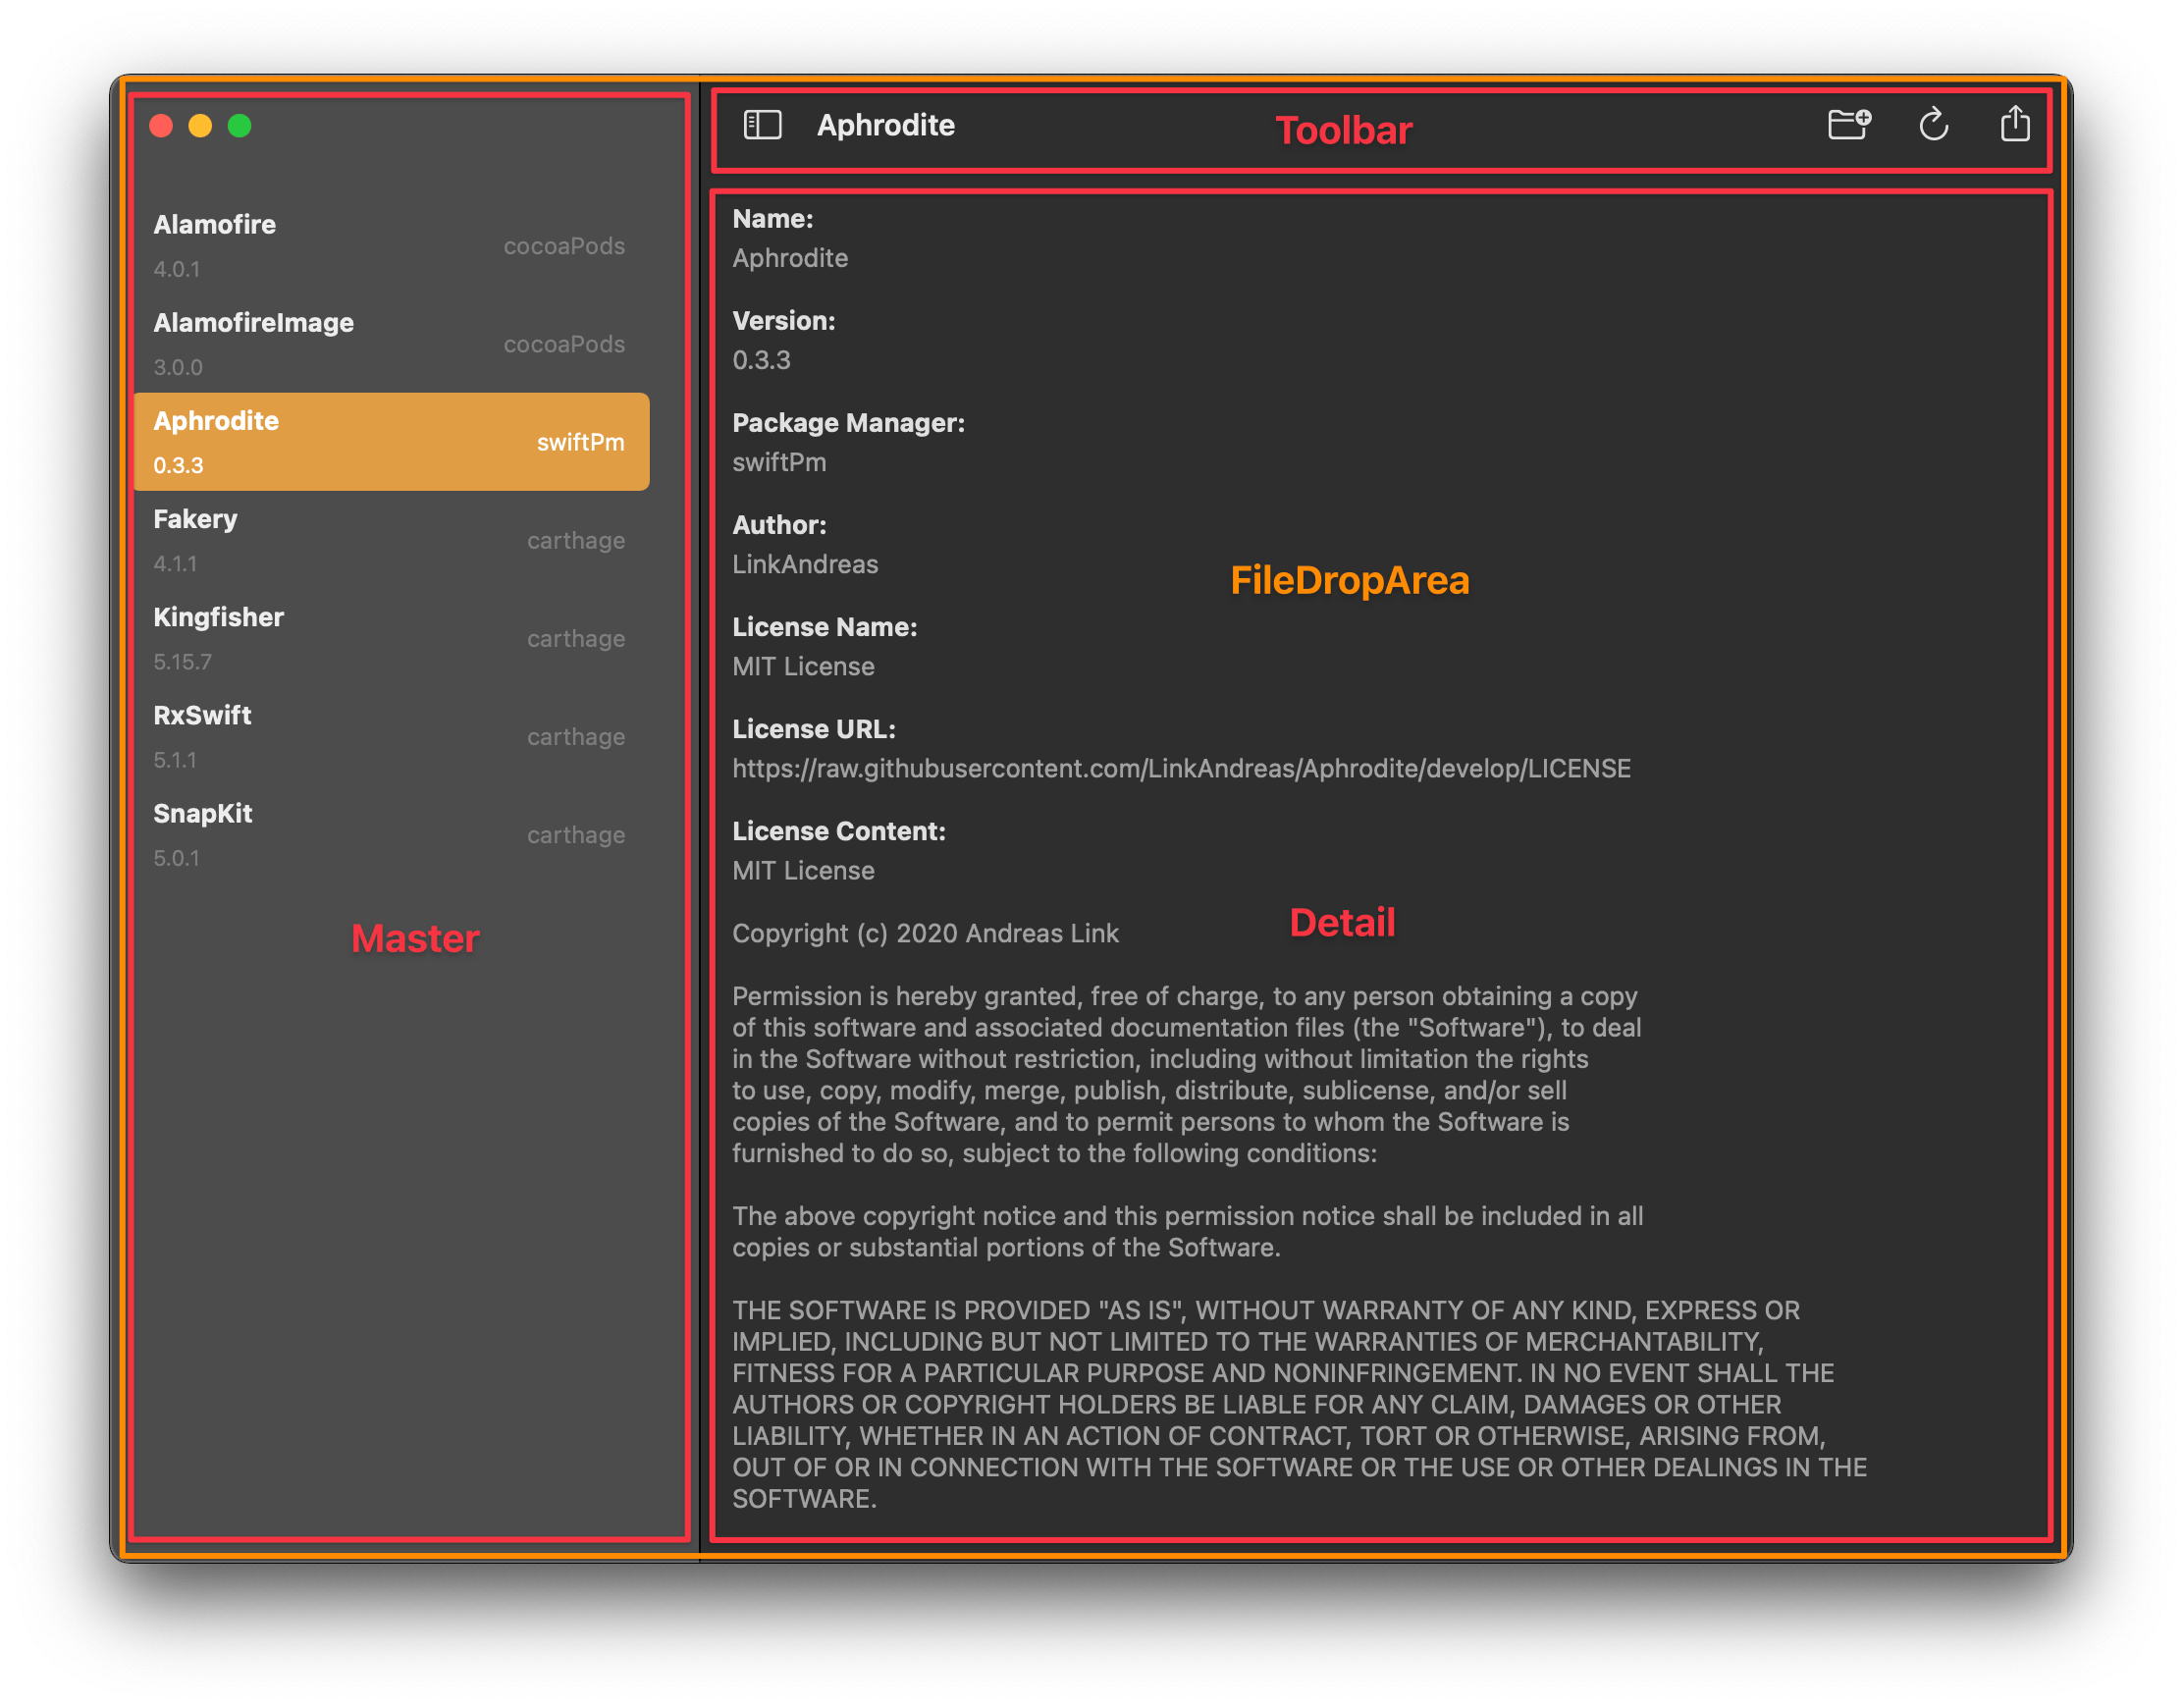
Hence, the content view uses the ViewStore of its parent to derive smaller stores that are dedicated for each child. As an example, the file drop area's store is derived from the parent by limiting its scope to the fileDropAreaState property. In addition, the actionMapper establishes the mapping between FileDropAreaViewActions and WindowActions.
struct WindowContentView: View {
    @ObservedObject var store: ViewStore<WindowContentViewState, WindowContentViewAction>

    var body: some View {
        FileDropAreaView(
            store: store.derived(
                stateMapper: \.fileDropAreaState,
                actionMapper: WindowContentViewAction.fileDropArea(action:)
            )
        ) {
            NavigationView {
                MasterView(
                    store: store.derived(
                        stateMapper: \.masterState,
                        actionMapper: WindowContentViewAction.master(action:)
                    )
                )
                DetailView(
                    store: store.derived(
                        stateMapper: \.detailState,
                        actionMapper: WindowContentViewAction.detail(action:)
                    )
                )
            }
            .toolbar {
                ToolbarItems(
                    store: store.derived(
                        stateMapper: \.toolbarState,
                        actionMapper: WindowContentViewAction.toolbar(action:)
                    )
                )
            }
        }
        .sheet(
            isPresented: store.binding(
                get: \.isOnboardingPresented,
                send: { isOnboardingPresented in .updateIsOnboardingCompleted(!isOnboardingPresented) }
            ),
            content: {
                OnboardingView(
                    store: store.derived(
                        stateMapper: \.onboardingState,
                        actionMapper: WindowContentViewAction.onboarding(action:)
                    )
                )
            }
        )
        .onAppear { store.send(.didAppear) }
        .onDisappear { store.send(.didDisappear) }
    }
}
File Drop Area
Note that SwiftUI features the onDrop(of:isTargeted:content) modifier which is well-suited for our needs. In addition to the supported file type, i.e., "public.file-url", we also specify a binding to isTargeted property of the store. Note that the binding is derived from the store such that it sends a .didUpdateIsTargeted(Bool) action as soon as a change is made. Similarly, the view store is notified by the view when files of the specified type are detected (.didSelectProviders([NSItemProvider]).
import SwiftUI

struct FileDropAreaView<Content: View>: View {
    @ObservedObject var store: ViewStore<FileDropAreaViewState, FileDropAreaViewAction>

    private let content: () -> Content

    init(
        store: ViewStore<FileDropAreaViewState, FileDropAreaViewAction>,
        @ViewBuilder content: @escaping () -> Content
    ) {
        self._store = .init(initialValue: store)
        self.content = content
    }

    var body: some View {
        GeometryReader { geometry in
            Group {
                VStack {
                    self.content()
                        .onDrop(
                            of: store.supportedFileTypes,
                            isTargeted: store.binding(
                                get: \.isTargeted,
                                send: { isTargeted in .didUpdateIsTargeted(isTargeted) }
                            )
                        ) { providers -> Bool in
                            store.send(.didSelectProviders(providers))
                            return true
                        }
                        .border(store.borderColor)
                }
                .frame(width: geometry.size.width, height: geometry.size.height)
            }
        }
    }
}
The file drop area's content consists of the NavigationView that establishes the master-detail relationship between the repository list (master) and the repository's detail view. Note that the latter is only shown when repositories exist. Otherwise, a placeholder is shown asking the user to either import manifests manually from disk or to use one of the example-manifests that are bundled with the app.
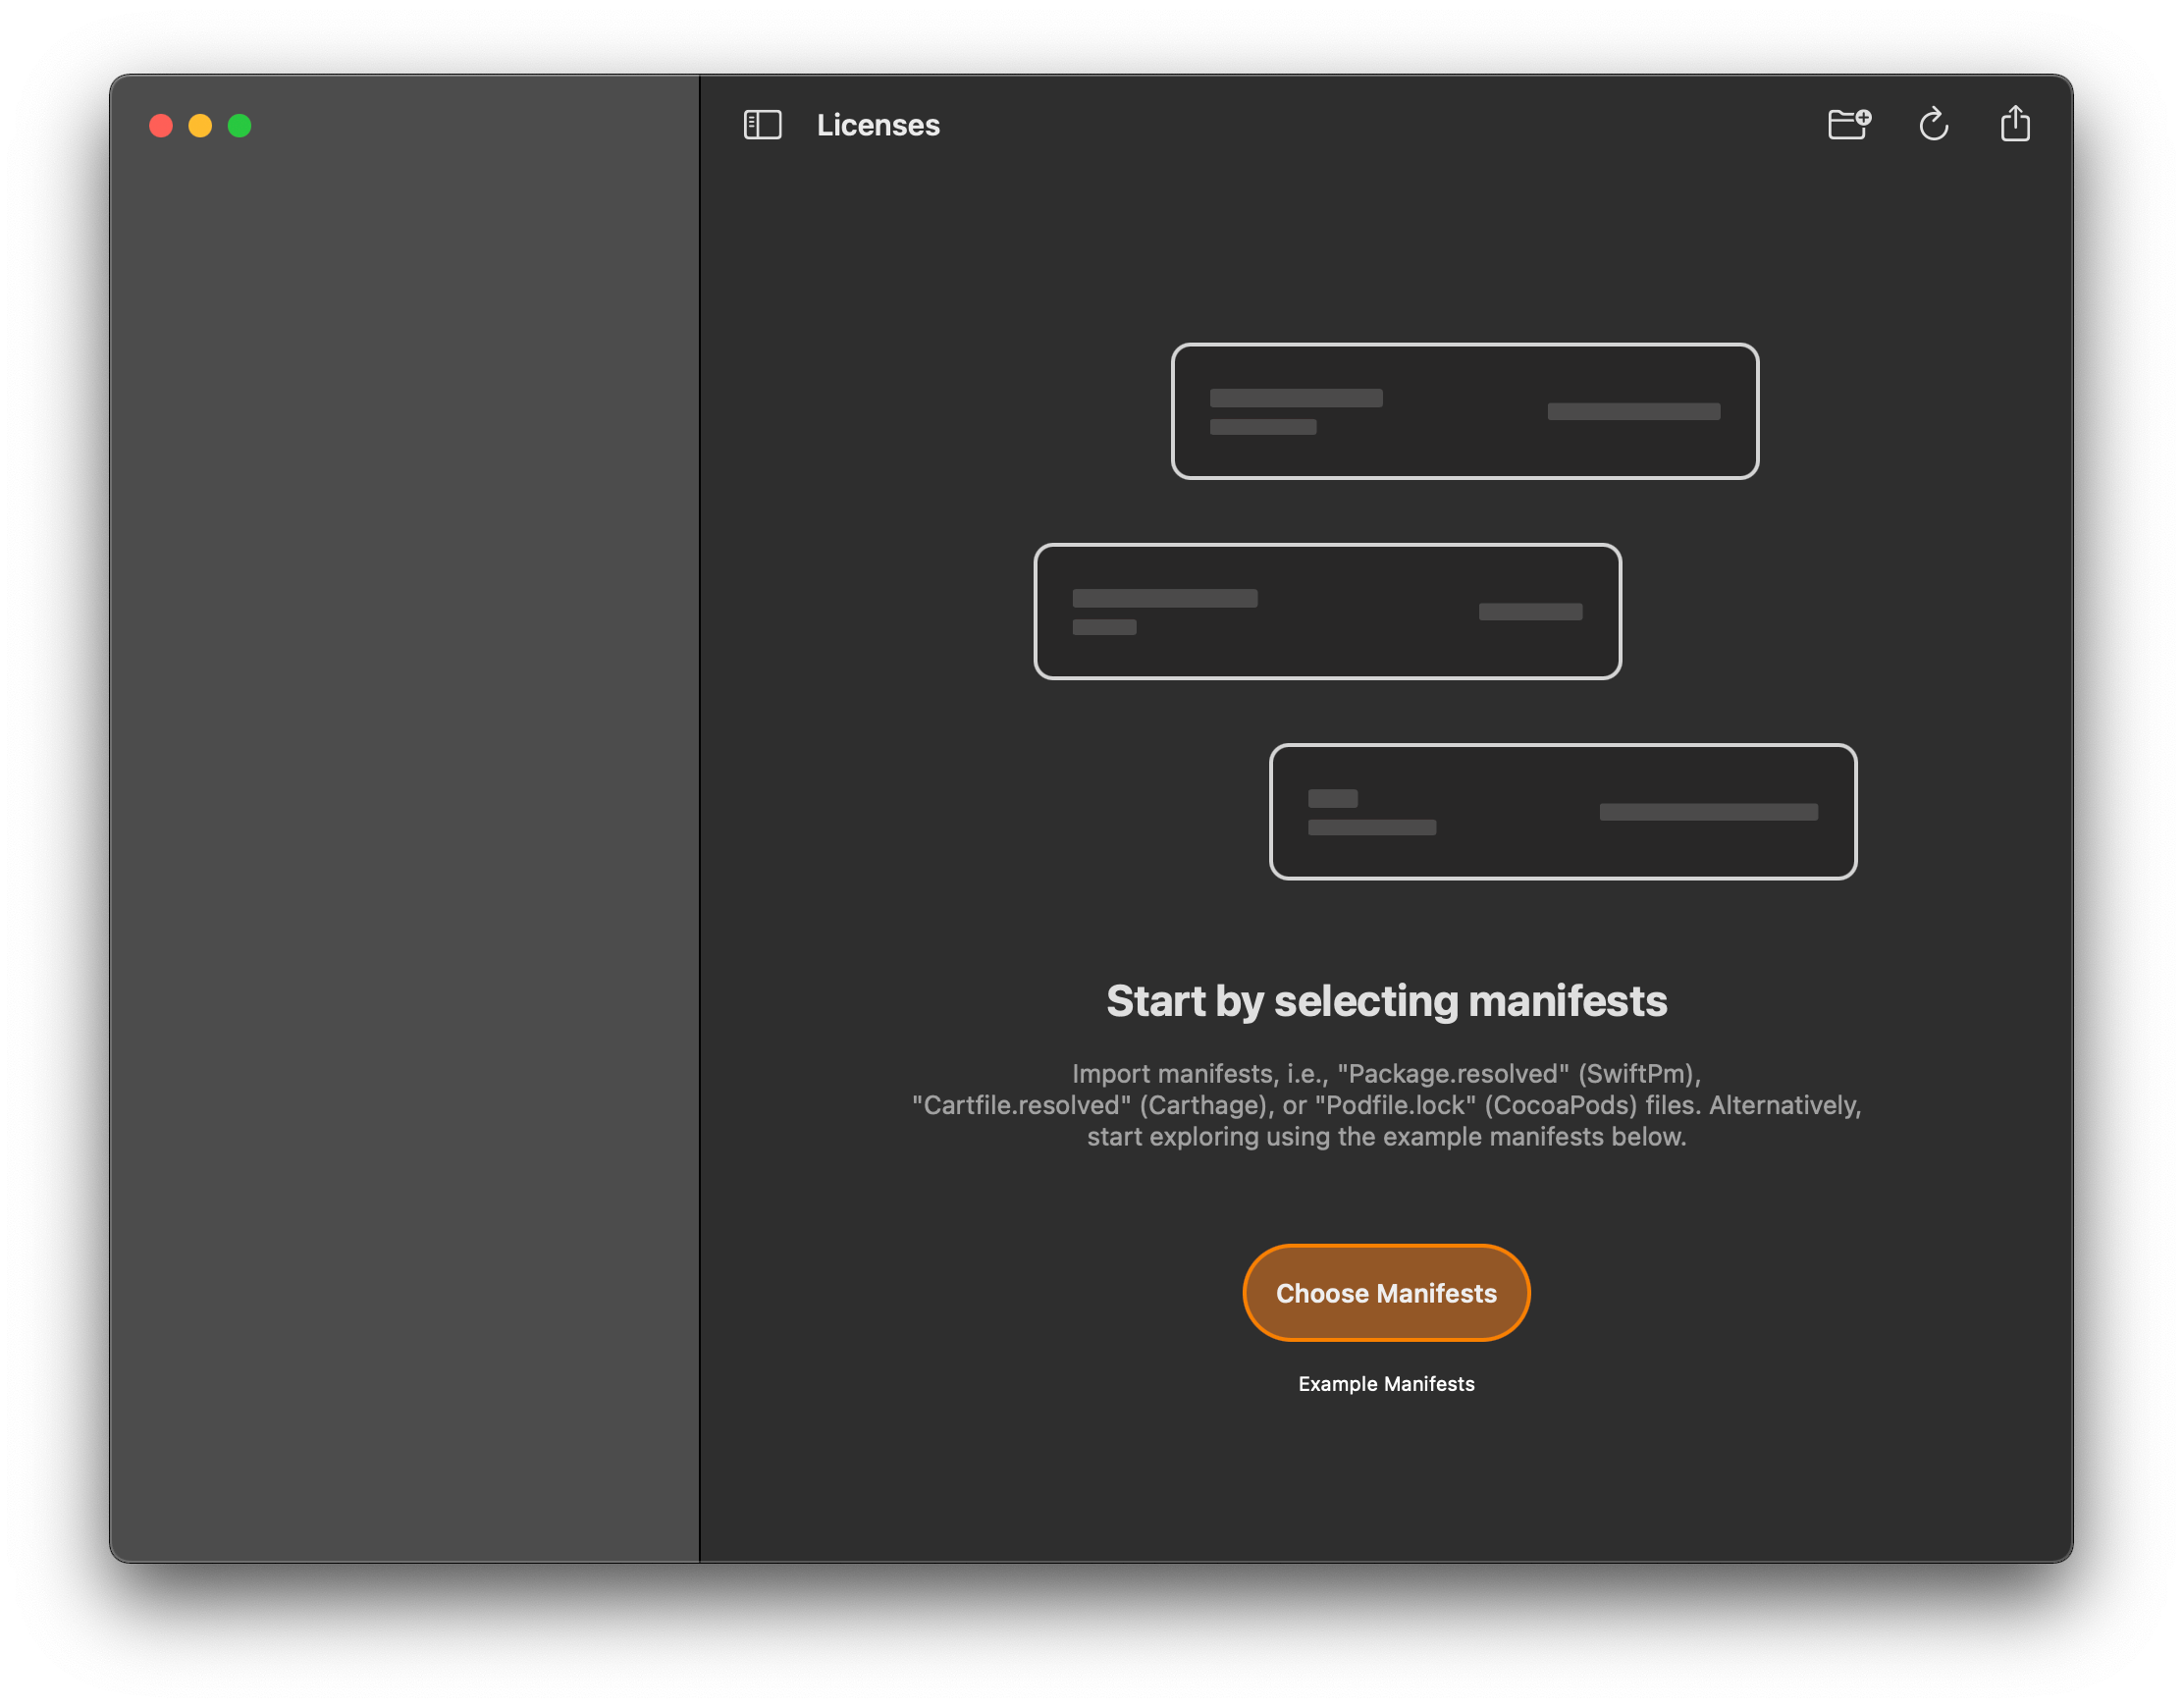
Repository List (Master)
As soon as manifests are selected, detected repositories are shown in NavigationView's sidebar. Unfortunately, I could not find a solution to specify different styles for the background of a list item, similar to what is offered by the .emphasized style of NSTableViewCell. The behavior is desired since we can improve the readability of the selected item by adapting the font color of the title and subtitle label in case that the item is selected:
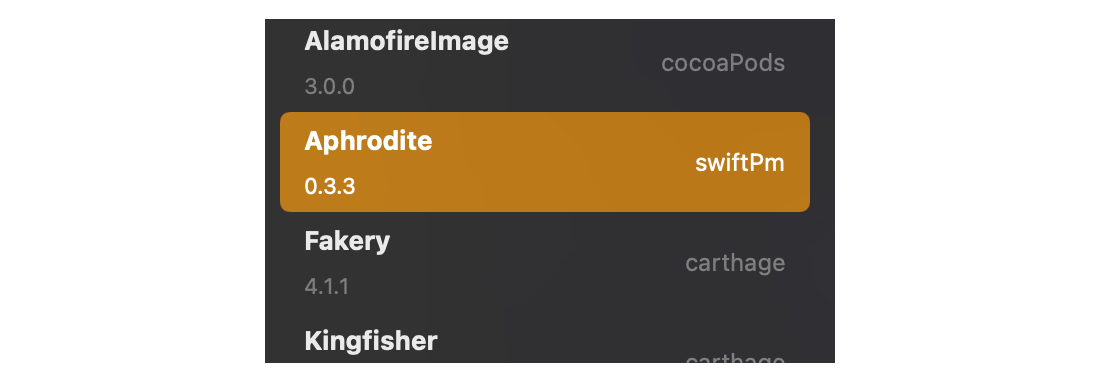
Although you can pass a binding to access the selected item, it does not account for the emphasized state of the cell and is only changed when the selection got made. To provide feedback even before the cursor is lifted, I decided to bridge to a standard NSTableView using the NSViewControllerRepresentable protocol:
import SwiftUI

struct RepositoryListView: NSViewControllerRepresentable {
    @ObservedObject var store: ViewStore<RepositoryListViewState, RepositoryListViewAction>

    func updateNSViewController(_ nsViewController: RepositoryListViewController, context: Context) {
        return
    }

    func makeNSViewController(context: Context) -> RepositoryListViewController {
        return .init(store: store)
    }
}

struct RepositoryListView_Previews: PreviewProvider {
    static var previews: some View {
        RepositoryListView(store: .constant(state: PreviewData.RepositoryList.state))
    }
}
Note that in the future we can drop the NSTableView and rather use SwiftUI's default List component as soon as the emphasized state is supported. If you are interested in the detailed implementation of the NSTableView please have a look at the source code on Github (Link).
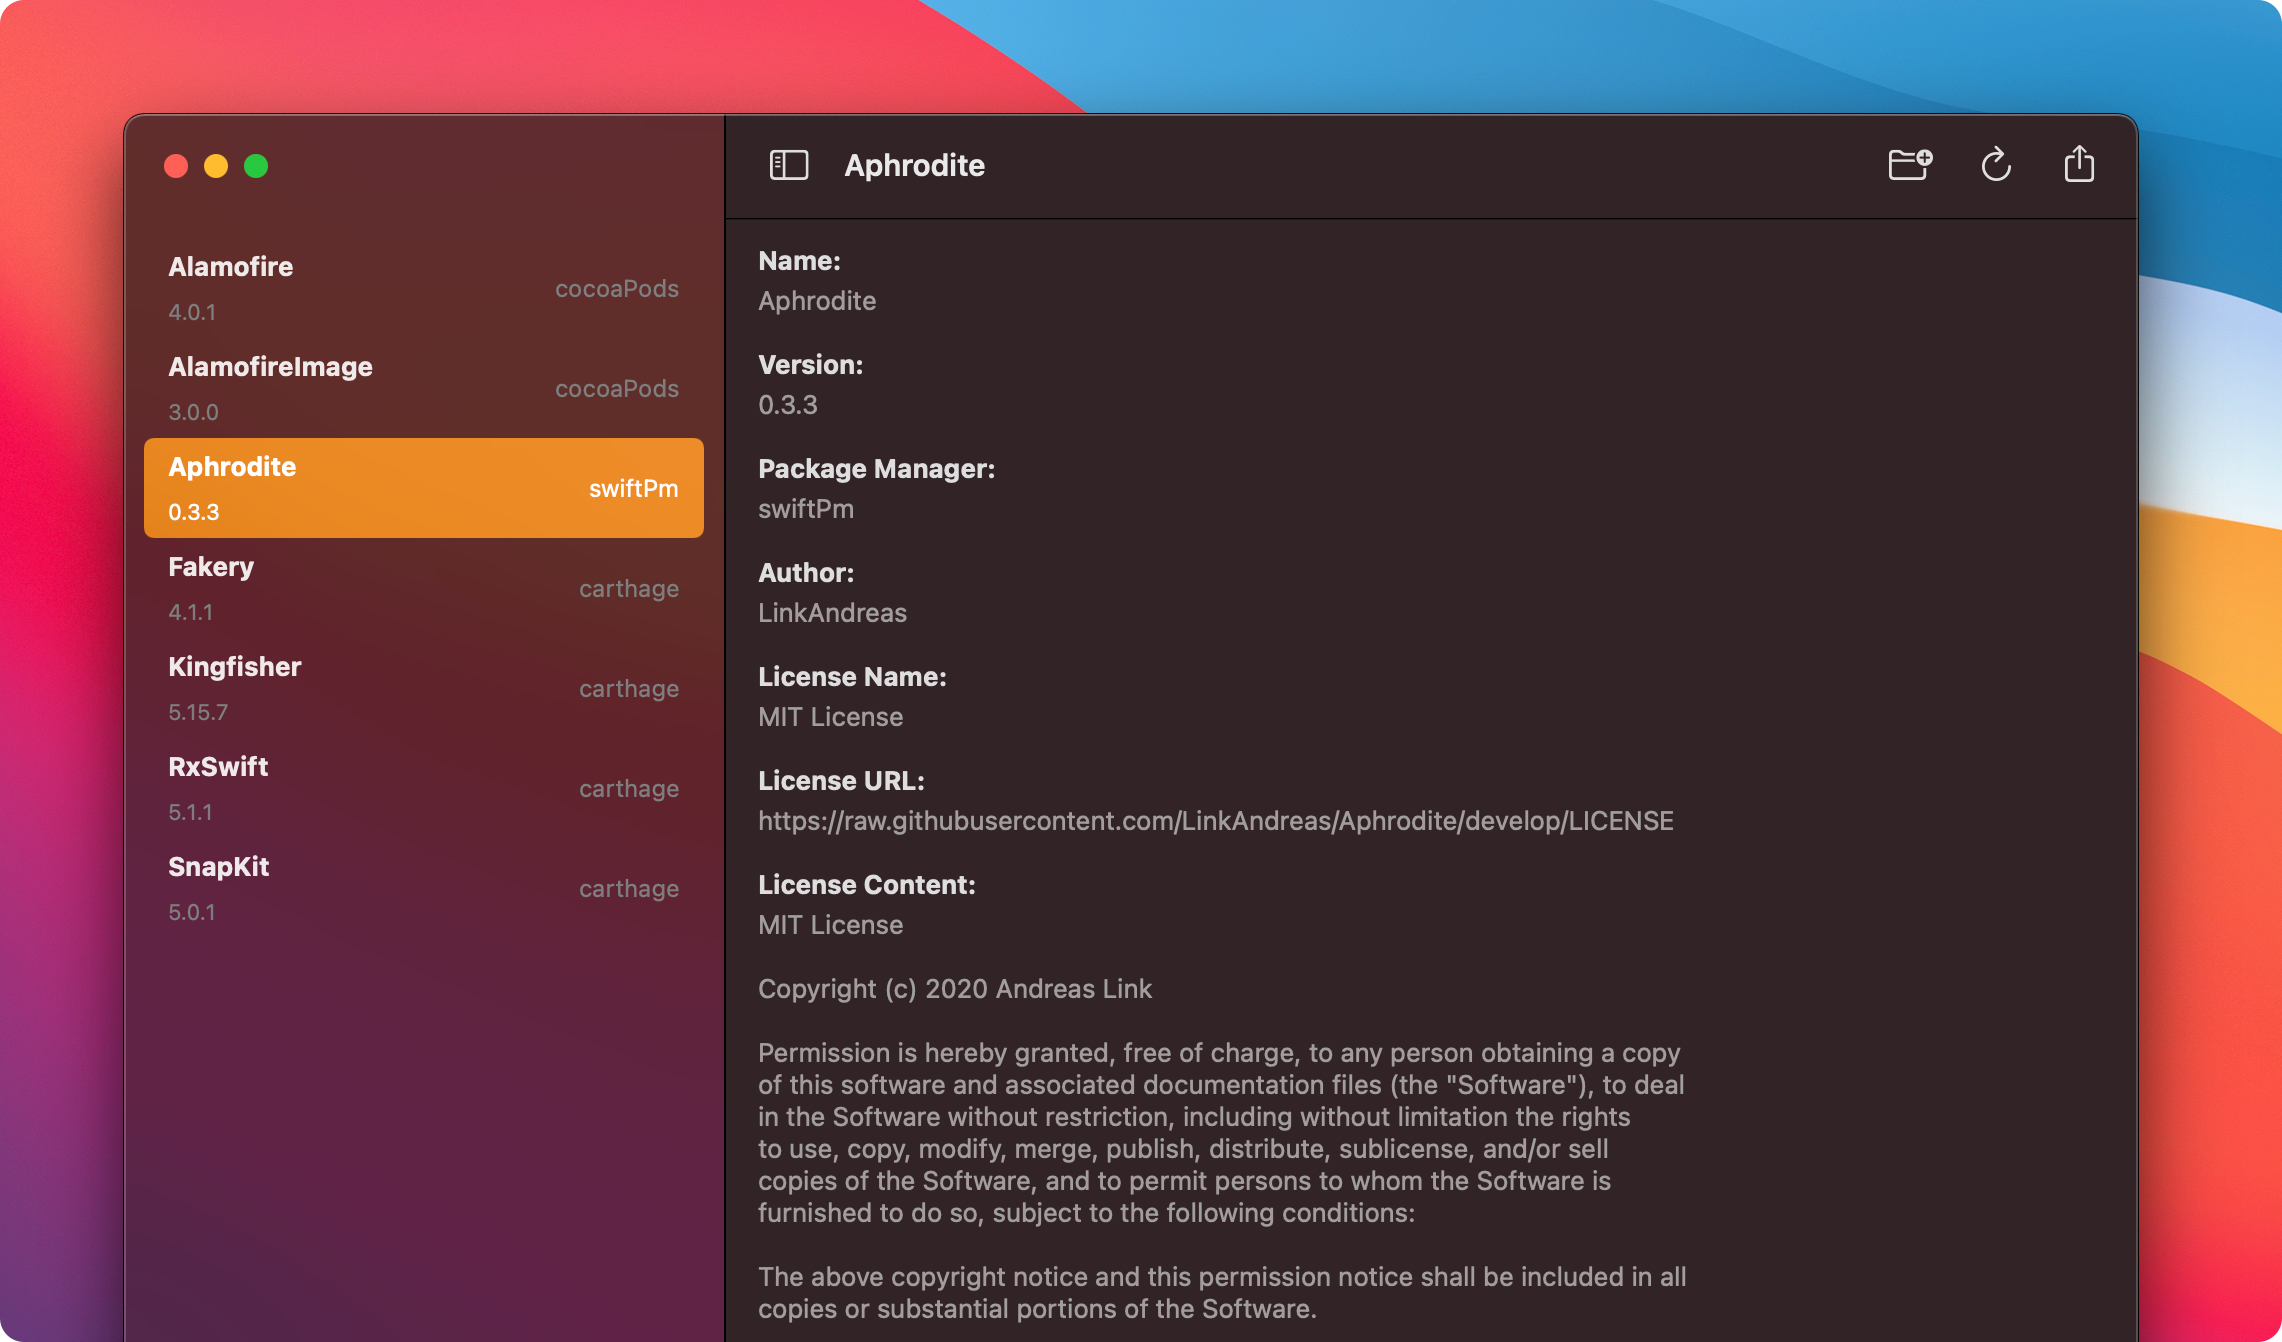
Repository Metadata (Detail)
The detail view of the NavigationView provides additional metadata about the selected repository, like the license's type and content that was fetched using the Github API:
struct DetailView: View {
    @ObservedObject var store: ViewStore<DetailViewState, DetailViewAction>

    var body: some View {
        Group {
            ViewStoreWithNonOptionalStateProvider(
                from: store.derived(stateMapper: \.listState).withoutActions,
                success: DetailListView.init(store:),
                failure: ViewStoreWithNonOptionalStateProvider(
                    from: store.derived(
                        stateMapper: \.placeholderState,
                        actionMapper: DetailViewAction.placeholder(action:)
                    ),
                    success: DetailPlaceholderView.init(store:)
                )
            )
        }
        .navigationTitle(store.navigationTitle)
        .frame(minWidth: 0, maxWidth: .infinity, minHeight: 0, maxHeight: .infinity, alignment: .center)
    }
}
Note that the detail view uses the ViewStoreWithNonOptionalStateProvider instead of the default ViewStoreProvider since the parent's listState and placeholderState may be nil. The DetailViewStateMapper decides whether the placeholder or a repository's metadata is shown. Hence, the ViewStoreWithNonOptionalStateProvider only renders the DetailListView in case that the parent's listState is not nil. Otherwise the provider fallbacks to the failure case and renders the provided component in case it exists. Similarly, the DetailPlaceholderView is only shown if the parent's placeholderState is not nil. This way, the ViewStoreWithNonOptionalStateProvider provides a non-optional state to the child if the parent's state is not nil. Otherwise, it the failure view is rendered.
Toolbar
The toolbar provides quick access to the main features of the app. As an example, users can import manifests using the toolbar's primary action. Besides, users can toggle the sidebar's visibility using the navigation button of the bar. Unfortunately, NavigationView does not offer a modifier to specify the sidebar's visibility. Instead, we can search for the SplitViewController that is the first responder in the key window and toggle its sidebar:
import SwiftUI

struct ToolbarItems: ToolbarContent {
    @ObservedObject var store: ViewStore<ToolbarItemsState, ToolbarItemsAction>

    var body: some ToolbarContent {
        ToolbarItem(placement: .navigation) {
            Button(
                action: {
                    NSApp.keyWindow?.firstResponder?.tryToPerform(
                        #selector(NSSplitViewController.toggleSidebar(_:)),
                        with: nil
                    )
                },
                label: {
                    Image(systemName: store.toggleMenuItemState.imageSystemName)
                        .foregroundColor(Color(store.toggleMenuItemState.tintColor))
                }
            )
            .help(store.toggleMenuItemState.hint)
            .disabled(store.toggleMenuItemState.isDisabled)
        }

        ToolbarItem(placement: .primaryAction) {
            Button(
                action: {
                    FileImporter.openFiles { filePaths in
                        store.send(.didChooseManifests(filePaths))
                    }
                },
                label: {
                    Image(systemName: store.chooseManifestsItemState.imageSystemName)
                        .foregroundColor(Color(store.chooseManifestsItemState.tintColor))
                }
            )
            .help(store.chooseManifestsItemState.hint)
            .disabled(store.chooseManifestsItemState.isDisabled)
        }
        ToolbarItemGroup(placement: .automatic) {
            Button(
                action: { store.send(.didTriggerRefresh) },
                label: {
                    Image(systemName: store.refreshItemState.imageSystemName)
                        .foregroundColor(Color(store.refreshItemState.tintColor))
                }
            )
            .disabled(store.refreshItemState.isDisabled)
            .help(store.refreshItemState.hint)
            Button(
                action: {
                    FileExporter.exportFile { destination in
                        store.send(.didChooseExportDestination(destination))
                    }
                },
                label: {
                    Image(systemName: store.exportItemState.imageSystemName)
                        .foregroundColor(Color(store.exportItemState.tintColor))
                }
            )
            .disabled(store.exportItemState.isDisabled)
            .help(store.exportItemState.hint)
        }
    }
}
To prevent unintended behavior while licenses are fetched, we disable the toolbar buttons using the .disabled() modifier. Also, the .help() modifier attaches a tooltip to each button, providing additional guidance for the user.
Onboarding
Finally, the .sheet() modifier is used to present the OnboardingView in case that Licenses is opened for the very first time.
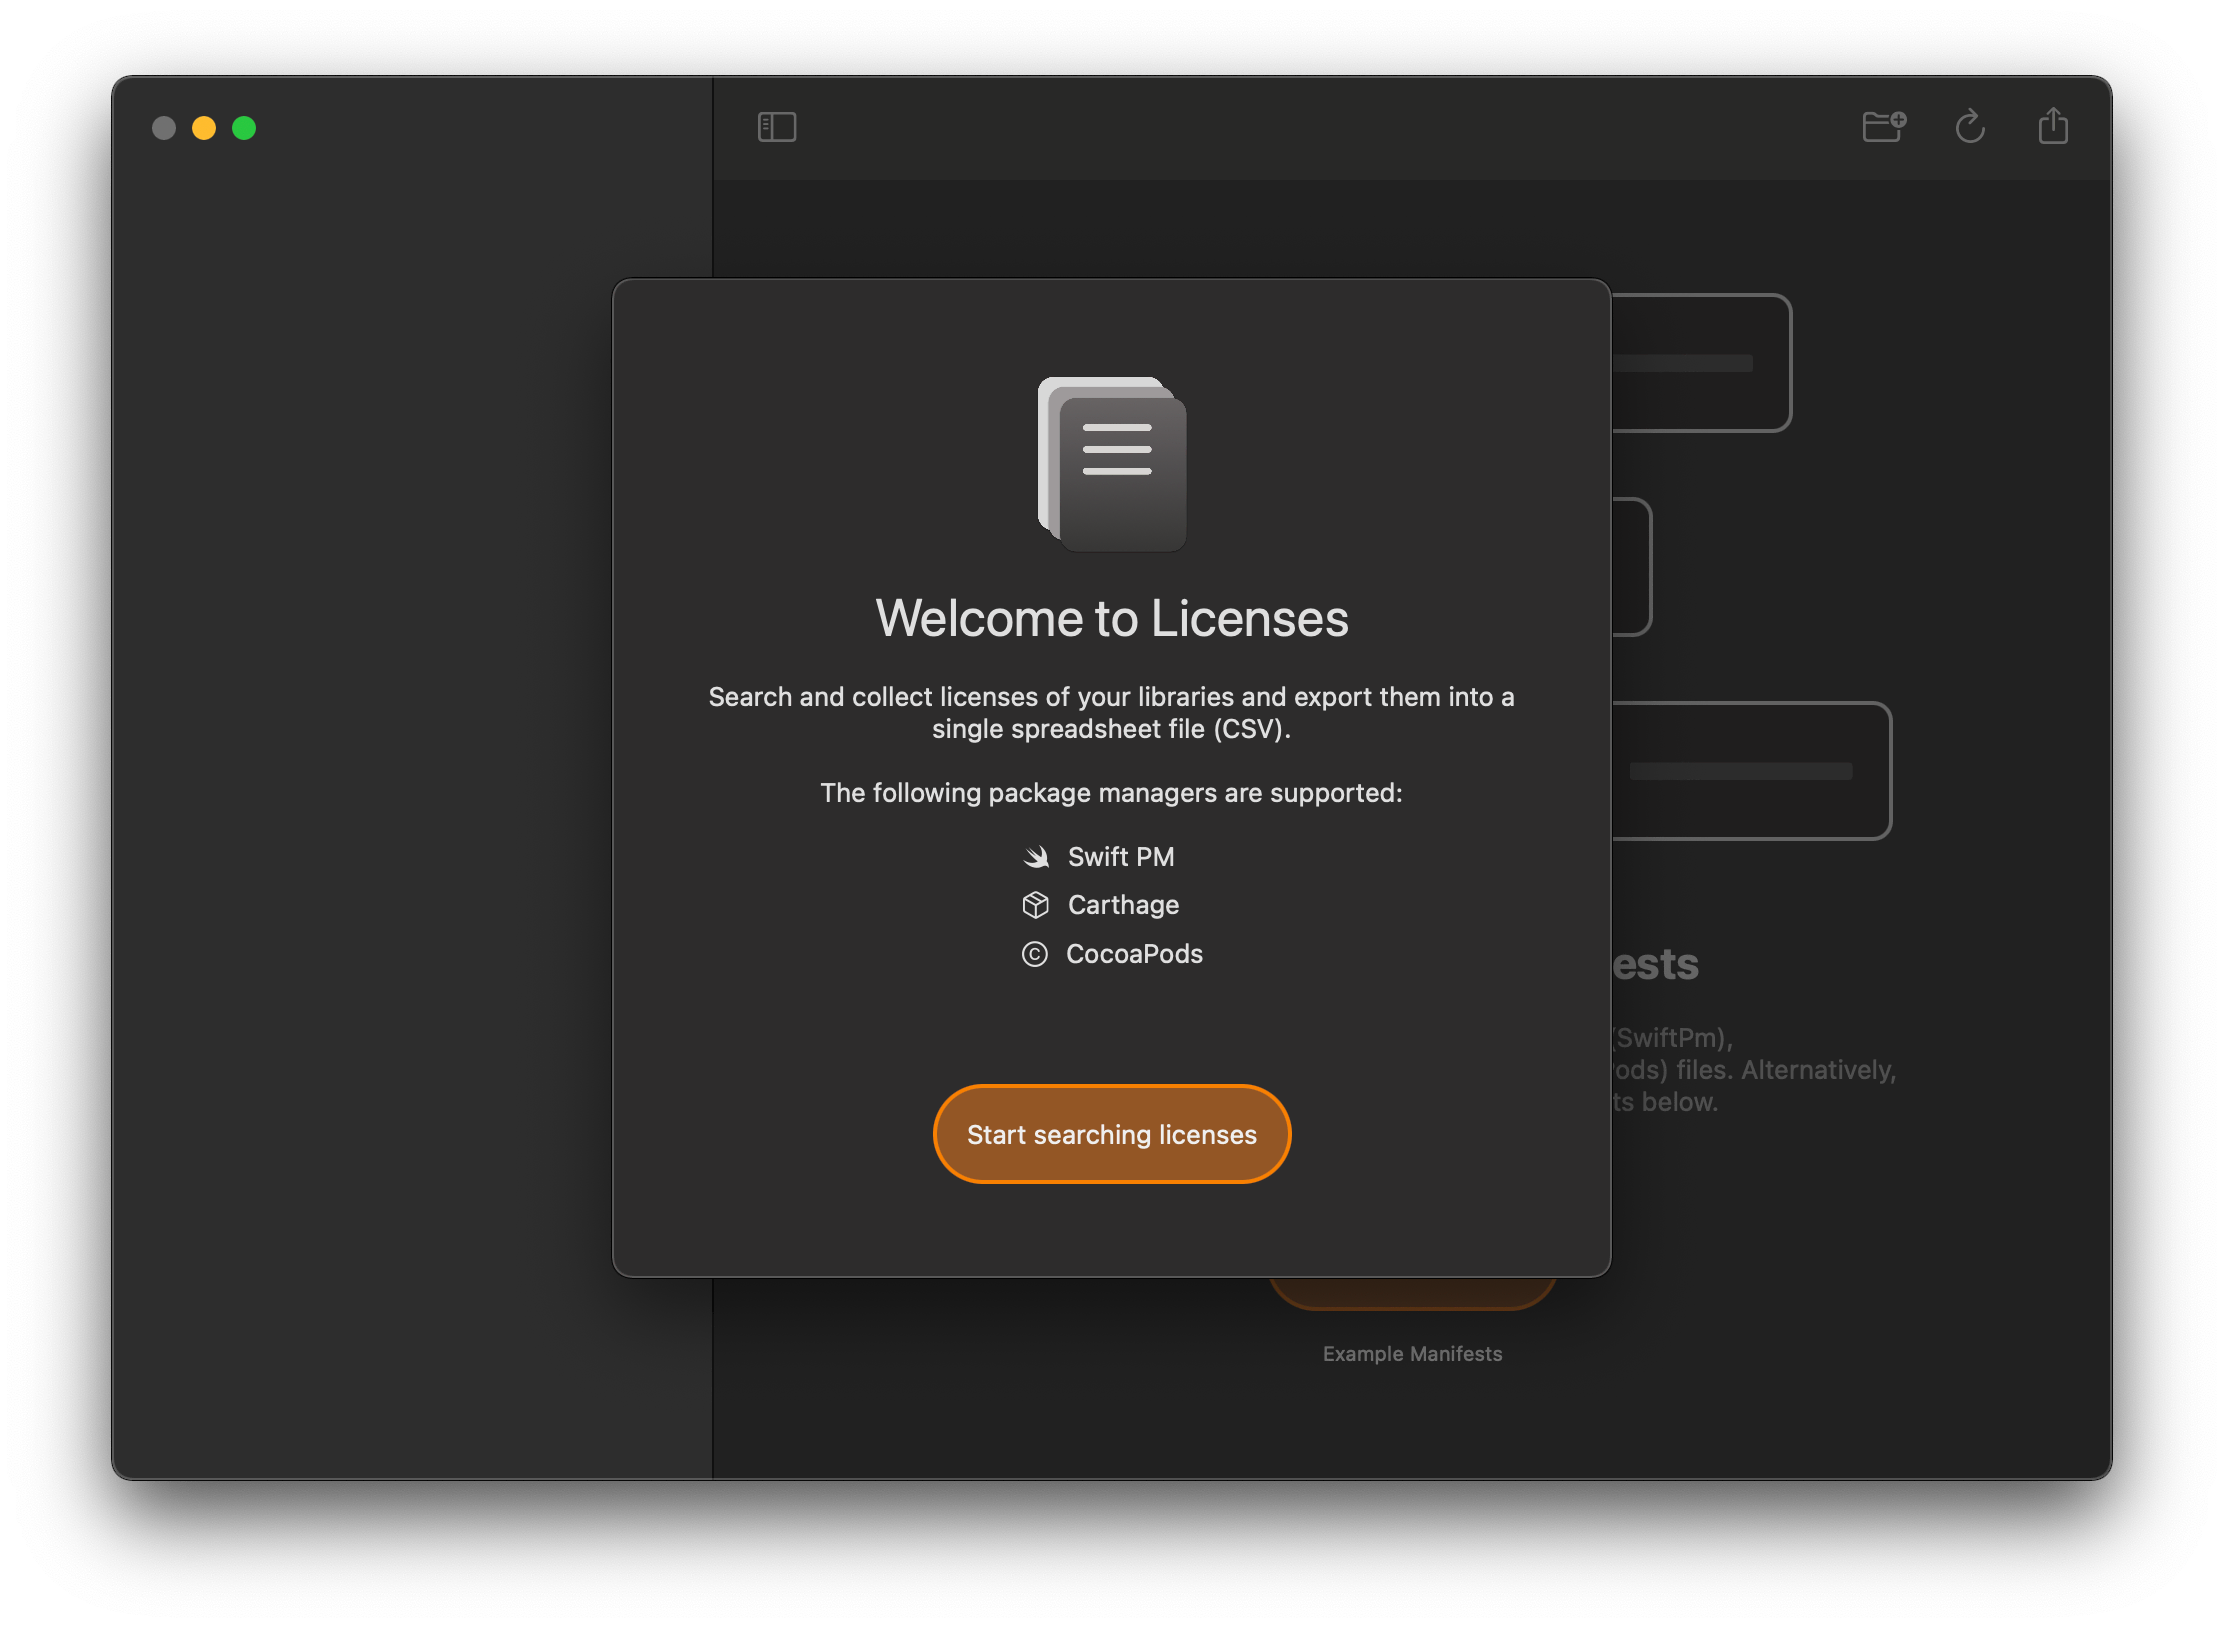
Note that we do not specify an action mapper, since the SupportedManifestsView is static and does not include any interaction. Instead, we use the .withoutActions property to derive an actionless store from the parent.
import SwiftUI

struct OnboardingView: View {
    @ObservedObject var store: ViewStore<OnboardingViewState, OnboardingViewAction>

    var body: some View {
        VStack(spacing: 16) {
            VStack(spacing: 0) {
                Image("icon")
                    .resizable()
                    .aspectRatio(contentMode: .fit)
                    .frame(width: 90, height: 90, alignment: .center)
                Spacer()
                    .frame(height: 16)
                Text(store.title)
                    .font(.largeTitle)
                Spacer()
                    .frame(height: 16)
                Text(store.subtitle)
                    .multilineTextAlignment(.center)
                Spacer()
                    .frame(height: 16)
                SupportedManifestsView(
                    store: store.derived(stateMapper: \.supportedManifestsState).withoutActions
                )
            }

            Spacer()

            Button(store.primaryButtonTitle) {
                store.send(.didTriggerPrimaryButton)
            }
            .buttonStyle(BrandedButtonStyle())
        }
        .padding(48)
        .frame(width: 500, height: 500, alignment: .center)
    }
}
Conclusion
This article walked you through the steps that I took when building a native Mac app using SwiftUI 2.0 and Combine from scratch. This way, I wanted to explore the capabilities of Swift UI and tried to examine whether it can be used in production. Even though a lot of the things that are offered by UIKit, like the .emphasized background style of a cell, are still missing, I appreciate the declarative nature of SwiftUI on the Mac. This way, we can avoid spending time on standard components like the master-detail view and rather focus on features that make up the app.
Happy Coding 🚀
References:
- LicensePlist - Masayuki Ono
- The Composable Architecture - Point-Free
- Redux like state Containers in SwiftUI - Swift with Majid